The following is an email from Liberty and The Patchwork Collective.
Dear Retailers,
We are thrilled to hear that The Patchwork Collective has been so successful amongst your customers! With our complimentary kits being in demand and available on a first come first serve basis, we are already running low on stock across all our retailers and the Liberty flagship store.
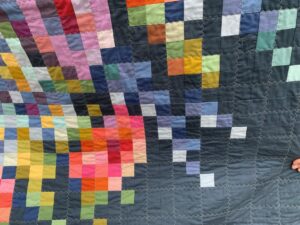
To resolve this demand, you are welcome to encourage customers to use their own pre-bought Liberty fabric to create their patchwork block. Choosing fabric from their own stash or a selection of designs from current collections, allows each square to be totally unique to each customer, so don’t be afraid to get creative! Please feel free to use any additional fabrics although we do ask for at least 60% Liberty fabrics in their creation.
As before, the customer should register their interest and return the kit to either yourself or Liberty by Friday 21st February 2025. The participant should also include a short note with the following information to credit the creator: their name, location, a short sentence on what inspired their patchwork square, and a few words on what Liberty means to them.
With current demands, we would also like to remind customers that their patchwork piece may be incorporated into the final in-store installation during May 2025; however, space is limited so we might be unable to feature everyone’s creations.
Wishing you a very merry Christmas and a happy New Year!
Best wishes,
The Patchwork Collective team
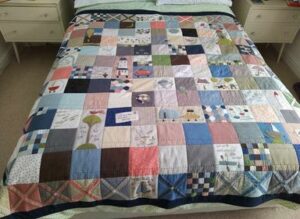
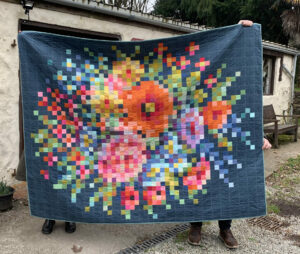
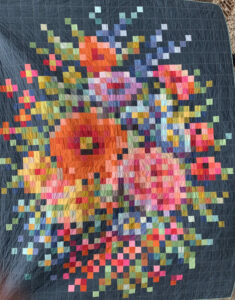
For 150 years, Liberty’s story has been woven alongside the artistic movement: a voyage of creativity and discovery through past, present and future that has shaped the fabric of our DNA.
Join us to celebrate their 150th anniversary: helping to bring this history to life. Liberty invite you, to collaborate in the creation of a new piece of art: a supersized patchwork quilt, comprised of hundreds of individual pieces – each created by you.
Destined to be displayed at Liberty in a special installation in May 2025, before living on in the Liberty archive, this collective artwork will tell a new story: the next chapter of Liberty’s history. A physical manifestation of the creativity, community, values and talent that make Liberty, Liberty.
Dust off your sewing machines and help us craft our patchwork living history.
How to get involved
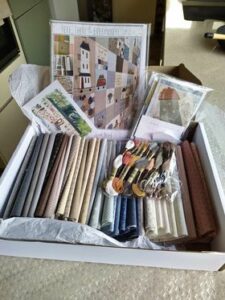
Register with Liberty HERE Just enter your email address in the space provided. They will forward all the information to you & Liberty will direct you to your closest participating store to pick up your pack. Each kit contains 5 pieces of fabric, roughly 45cm x 20cm – these are a mix of Tana Lawn™️ and Lasenby cotton – and a returns slip which will help Liberty to identify each maker. Packs are limited and are first come first served. Feel free to also use your own Liberty fabrics.
The idea is that we all create a 25cm square using a free downloaded pattern from Liberty or your own design.
We are hosting a Liber-Tea for registered participants on Wednesday 15th January to get us all inspired. Click HERE for details.
Return your square to Liberty by Friday 21st February 2025. Make sure to complete your returns note, so Liberty can identify your unique square! If you are returning to us then please get it to us by Friday 14th February to give us time to post them all together.
Share your design on social media! We’d love to see your creations and process, simply tag us @libertylondon @libertyfabrics @coast&countrycraftsandquilts #LibertyPatchworkCollecive
Visit Liberty during May 2025 to for the big reveal of The Patchwork Collective installation in-store
***WHAT YOU NEED TO KNOW***
You MUST be registered with Liberty to participate
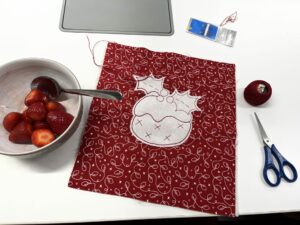
You will need to create a 25×25 cm patchwork square.
You must leave a 1.5cm seam allowance around the edge of your square.
Download the free patchwork patterns, or use your own design if it matches the required dimensions.
Please use the Tana Lawn or Lasenby Cotton fabric provided by Liberty and/or own materials. We do ask for at least 60% Liberty fabrics in your creation!
Get personal – unique embroidery and embellishment very much encouraged! We’d love for each square to be entirely unique, so don’t be afraid to get creative!
Please DO NOT back your square. This is very important for the structure of the installation, and we may not be able to use your square if you have backed it.
After receiving the latest range of Snowman Gatherings by Moda, Sally fancied making a slightly different version of Lynette Anderson’s “Snowmen Make Me Smile Cushion“.
The cream pompom trim used can be found here (Sally also trimmed the upper part of the envelope backing with pompoms, & Lynette’s Mr Snowman button can be found here.
Sally followed Lynette’s instructions making the stitchery & cutting the background that the stitchery is appliqued on. She selected 5 mini charm squares each for the top and bottom borders & 7 mini charm squares each for the two side borders. She made an envelope back & finished off binding the edge of the cushion.
If you would like to order a kit of this project (while stocks last) please contact us.
We will update this page regularly to add more photos so don’t forget to come back to check it out for inspiration. If you would like to share your creations pop in so we can photograph it or email us a clear picture and we will let the world see how fabulous you are.
Delia asked us to make a fabric pack in an alternative colourway for the Meags and Me Blue Goose pattern. She wanted it in Greys, creams and mustard. We think we did a good job choosing the fabrics and she has done an amazing job sewing it.
Carole knew she would find inspiration for her Sashiko panel and look what she created? We love the idea of using a smaller piece as a pocket on the cushion back. Genius!
We all love the soft snuggly Sheep flannel and fell in love with what Ros has done with the fabric. How cute and simple is this? Apparently her grandchildren adore it. We can see why!
Judith used flannel to make a winter quilt and then used the excess to make a cushion cover with the Kathy Schmitz Winter Sampler. Beautiful
Ros has been busy making One Little Flower by Gail Pan. She used one of the fabric packs we put together and we are so pleased that it has turned out so beautifully.
Janet sent us these photos of her beautiful use of our Lucky Dip Stitchery packs. What a gorgeous project with some added lace for a cute look.
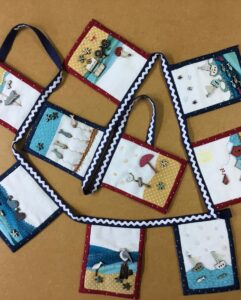
Jeanette has thanked us for inspiration and look what she has made. A beautiful seaside bunting using our wooden buttons and Seaside Town by Lynette Anderson.
Dee made these simply amazing festive Luna Lapins. She made sure to check our bags and pockets when she left as we were very keen to keep them!
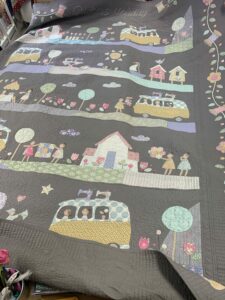
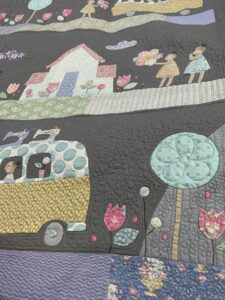
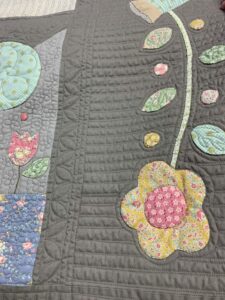
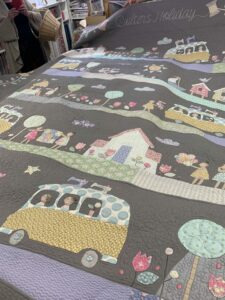
We were absolutely in awe of the stunning Tilda Quilter’s Holiday made by Julie and quilted by Sandy Chandler. Made using a kit from us following a pattern in Homespun magazine. Breathtaking work from them both.
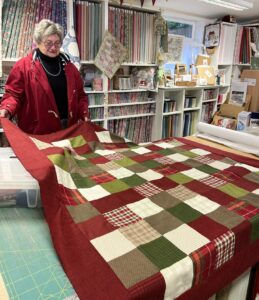
Margaret has made a simple but beautiful quilt top using a selection of flannels from the shop. We all wanted to take it home. For extra snuggle factor she is backing it with our polar fleece. When using a fleece backing you do not need wadding.
Joanna was inventive with a Heather and Sage panel and made this beautiful quilt for her grandchild.
Alicia has been super productive and has made three versions of Life’s a Journey for gifts.
Which is your favourite colour way? We think it is hard to choose as they all look beautiful.
Siobhan put her own twist on the lovely Garden Gathering Bag by Gail Pan. She used a variegated thread in place of redwork to create a superb result.
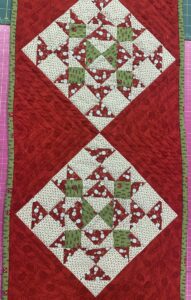
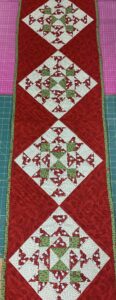
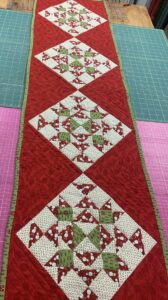
Trish has made this festive table runner using the Blizzard range of fabrics.
She made a pieced back too, lovely.
Alicia has been very busy. These two beautiful quilts brought a smile to our faces.
Sally plucked up the courage, after a little persuasion from us, and made the Tilda Lazy Gardener quilt using a kit from us. She is pleased with it and we think deservedly so.
Claire made up the Cottage Garden Kit from Beaks and Bobbins. She says she has not worked with ribbon and beads before and loved the process of learning and developing new skills while she was recovering from illnesses. We love her work and the way it is displayed.
Lorraine designed this quilt herself using mainly Blume and Grow fabrics. Some of the blocks are by Thimble Blossom and Lori Holt. What a triumph this is.
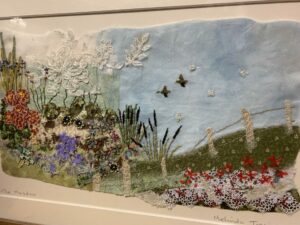
Mel showed us her absolutely stunning landscape, titled The Meadow, using fabric and lace scraps. We love her use of all the tiny bits of fabric and lace and the mix of stitch and appliqué.
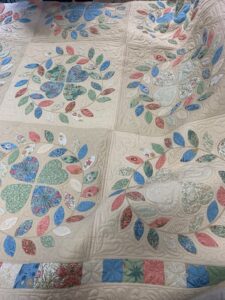
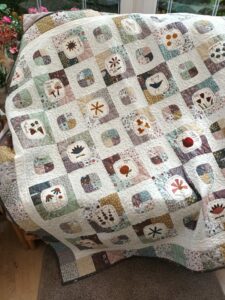
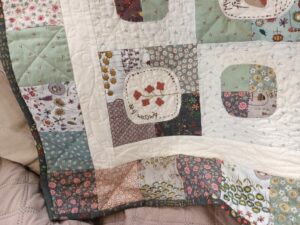
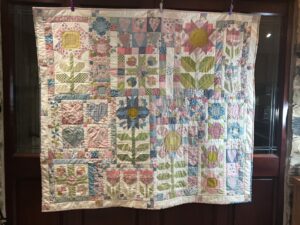
We love Tilda here at Coast and Country and look at this beautiful example of the Embroidery Flower Quilt. It is a Tilda pattern and uses Tilda Solids to give the impression of an embroidery design.
We like the way the quilting has been done too.
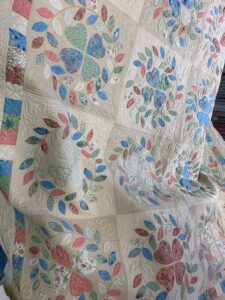
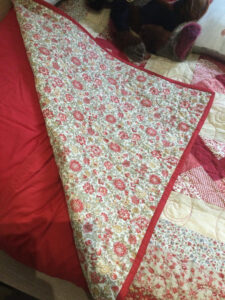
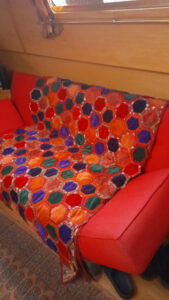
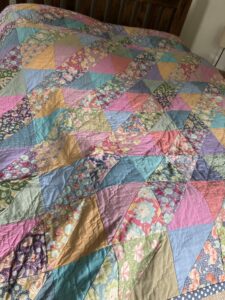
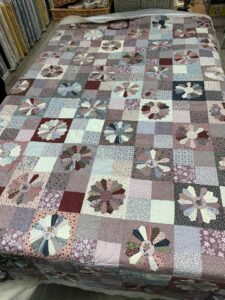
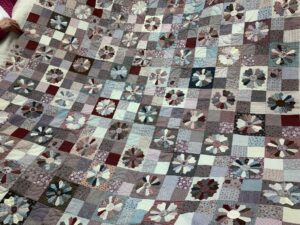
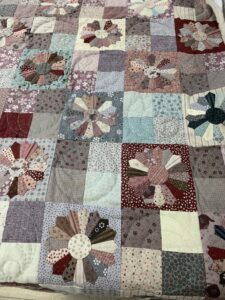
Sylvia dropped by to show us her simply gorgeous Celtic Knot quilt made using Liberty fabric. Such a lot of hard work using hand applique and hand quilting. Utterly beautiful but she says it will end up in her wardrobe. This needs to be displayed for all to see, a proper heirloom.
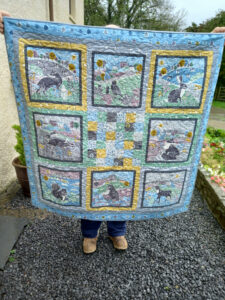
Look at this joyous photo of little Lane sat on the Seagull Quilt made by his Great Grandma Valerie in Canada using a fabric pack from us. The Seagull Quilt pattern is in the Nautical Quilts Book by Lynette Anderson. We are in love with both Lane and the quilt.
Look at this stunning version of Hatched and Patched BOM The Santa, The Tree, The Turkey and Me. Jacqueline visited us to show us what she’d created using her stash of felt and fabric scraps from our popular scrap bags. We love the original design that uses wool applique, but we adore this version too. Look for the fussy cut images and the clever use of a variegated thread for the meandering hand quilting.
Kim showed us her deliciously colourful quilt made by combining Kaffe Fasset fabrics from a fat 1/4 bundle, with a bright white sashing. Stunning.
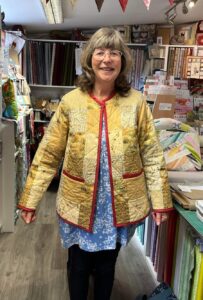
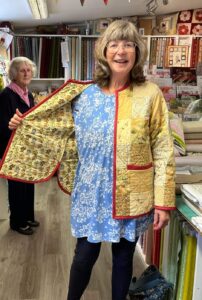
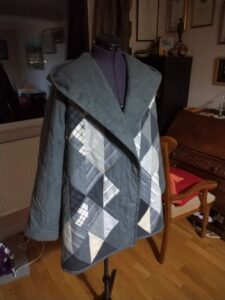
Look at Lorraine in her gorgeous patchwork jacket from the Great British Sewing Bee Book. She used a selection of our fabrics plus a quirky birdhouse end of roll bargain for the lining and a bright pop of colour for the binding. She said she went way out of her comfort zone making this but is so happy she did. We love it Lorraine.
Jill says she is a relative newcomer to quilt making but we are thoroughly impressed by her perfectly pieced Spoondrift Quilt by Janet Clare. She has used the To The Sea Fabric kit. Absolutely stunning.
Look at this beautiful lockdown quilt from Sarah, using her stash bought in a hurry before we closed the first time. It is a gorgeous blend of needle turn applique using William Morris fabrics and superbly quilted by Sandy Chandler.
Look at this labour of love from Anne.
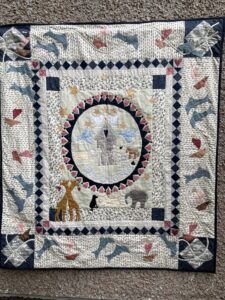
She made this Noah’s Ark quilt for her grandson from a Jo Colwill
We were thrilled when Brenda brought in her Bluebird Quilt by Janet Clare that she’s had as a kit & was given as a gift last year, how gorgeous!
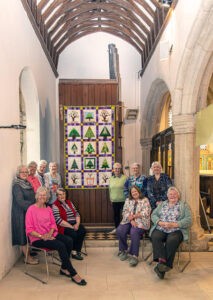
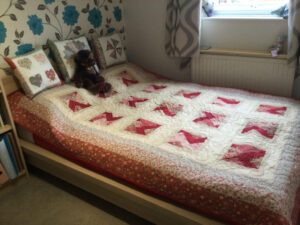
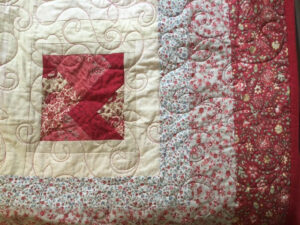
The ladies at St Wenn Quilters have been busy making this delightful quilt in honour of the Queen’s Platinum Jubilee. We think it is stunning. Well done all involved
This beautiful Camden Bag was made by Rachael and she’s making many more. Using the pattern by Two Aunties, a jelly roll and the jumbo and super jumbo Dill buttons. We nearly didn’t let her have this bag back!Look at these gorgeous cushions made by ladies on a recent workshop at a local group, taught by Sally using her Honeybun Kisses pattern
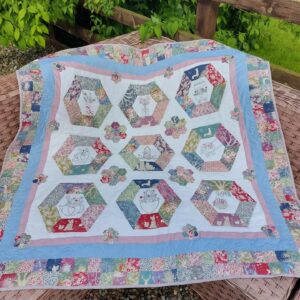
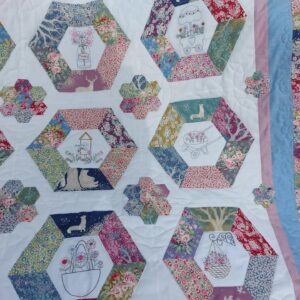
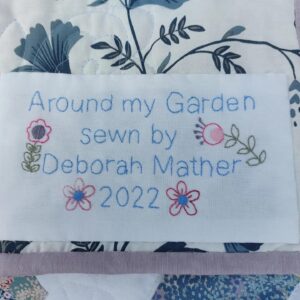
Look at this beautiful Around My Garden quilt completed by Deborah using a kit from us. Just stunning
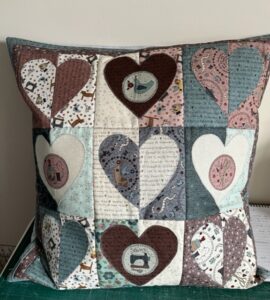
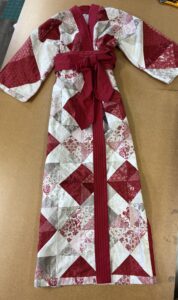
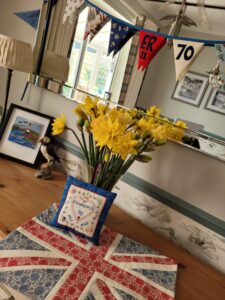
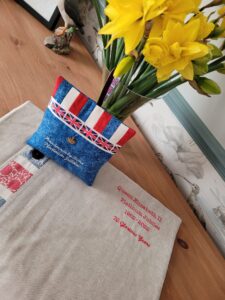
Ann has made this pretty cushion using her stash of One Stitch at a Time fabric by Lynette Anderson. She’s now busy making kits for her sewing group so they can make one too. We think it is beautiful.Linda came back in with a new summer version of her Kimono that she has lovingly made using selection of Cranberries and Cream fabrics. It took one layer cake, two charm packs and 2 mini charms and was made using a vintage Vogue pattern.Fiona has used the kits in the Platinum Jubilee Box to make the bunting, Union Jack cushion and the pincushion. She has added extra details with machine embroidery and we think it all looks amazing. Fiona said some of the embelishments were to hide errors but we are sure they are really purposeful design elements. How often do we do something similar and end up with a much improved individual project.
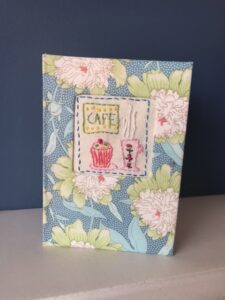
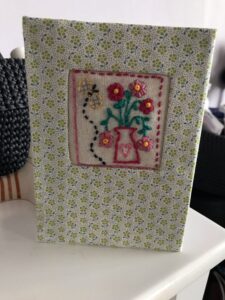
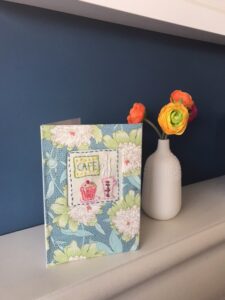
Look at these delightful cards that Lisa made using one of our Lucky Dip Stitchery kits, aperture cards and her imagination. We love that she has been inventive with the threads, fabrics and images.
Jane has made this very beautiful quilt using mainly French General fabrics.
These two Easter Egg Hunt wall hangings were made by Deborah. We love how she has put her own twist on them both. Pattern is by Hatched & Patched
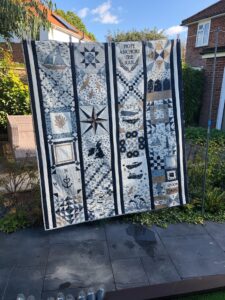
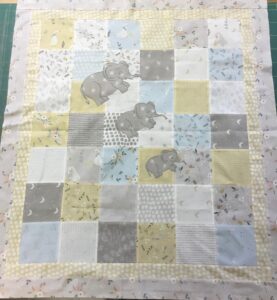
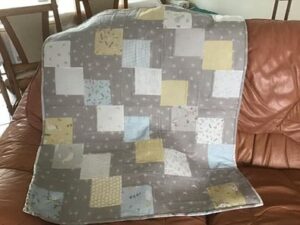
Jan asked us to create a vibrant kit for this Nautical Flag quilt. This pattern is in Nautical Quilts book by Lynette Anderson.Alison Made this seaside bunting from our button and fabric kitsKathy appliqued a cute trio of elephants onto a quilt top made using Little Ducklings fabricsSue also used Little Ducklings fabrics for her quilt top. We love how the two quilts look so different but so pretty.Look at this amazing quilted kimono worn proudly by it’s creator. It was a real labour of love and we are pleased that we helped with the creation of her vision. From sketches and an idea of colours to contrast with the William Morris print, the kimono came to life.
Pat has been busy making these two beauties. One using Janet Clare fabrics and the other the Habitat range. Very different looks but both lovely.
Cindy has been very busy with these quiilts, some inspired by photos in the Quiltmania Diary that we sell each year. What gorgeous colours.
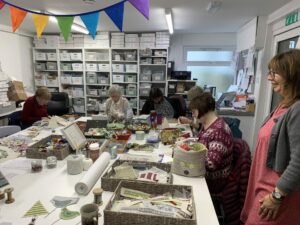
We have been so excited to hold classes again. We were hoping that they would be held in the new workshop space, but it has been delayed. Not to worry, everyone had a wonderful creative time. Here are some of the makes.
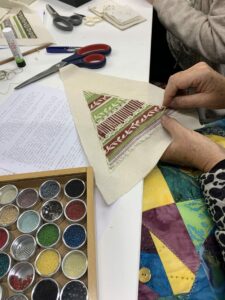
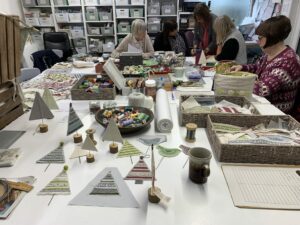
Louise Nichols ran a lovely Festive Lino cut tree workshop. Despite everyone having access to the same ‘ingredients’ they have all turned out differently. It was a really relaxed day and we welcome Louise back in February. If you can’t wait then we have plenty of her kits in store.
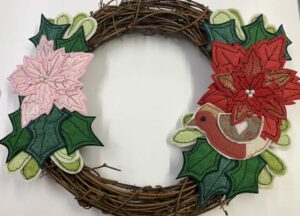
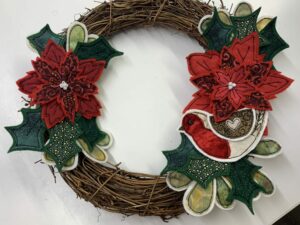
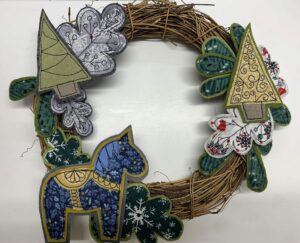
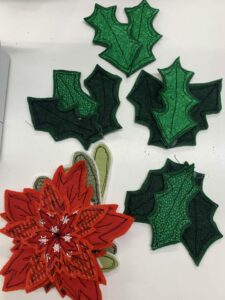
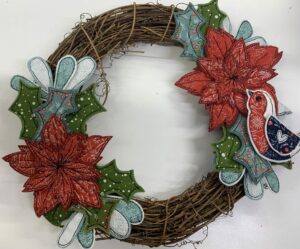
Caroline Michelle ran a fun Free Motion applique wreath making workshop. Look at the stunning makes, again, all a little different. Caroline will be back in 2024 to teach more free motion applique classes.
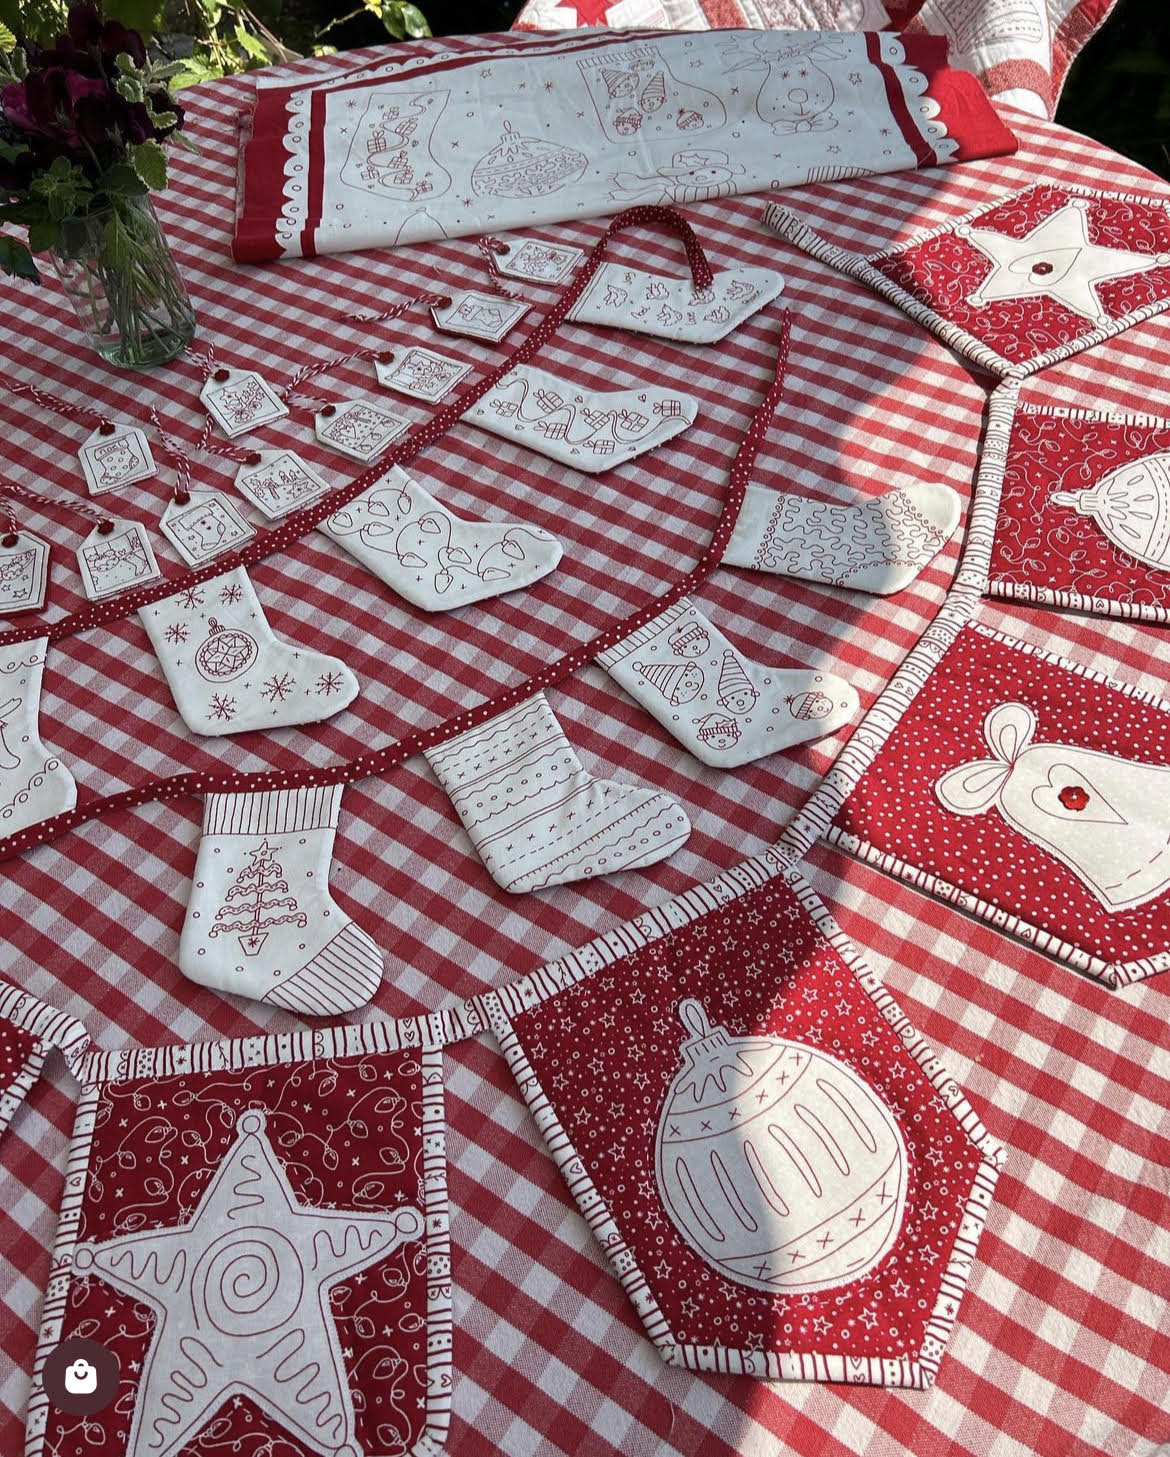
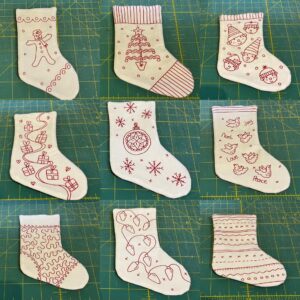
Mandy Shaw has created a beautiful Redwork Christmas range for this year which includes two panels. The first is a stocking lap quilt that comes pre-printed where you can quilt on the lines or even highlight the redwork designs with red perle.
The second panel is her bunting panel, suitable for many Christmas Projects. Mandy Shaw suggests using each image to applique onto a background fabric to make bunting. Then using the stockings as stocking shaped bunting garland. Of course the images can be cut and appliqued onto backgrounds to make cushions, bags, a quilt or even a Christmas Garland, there’s just so many ideas!
We have put some fabric packs together which include fabric, panels, bunting tape & ric rac for you to make both the stocking & ornament garlands.
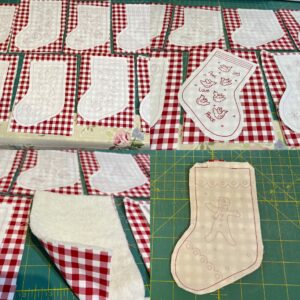
Here are some instructions to help you: Stocking Bunting: Cut out all the stockings from the bunting panel 1/4″ outside of their outer line. You will need approximately 30cm x 110cm of a backing fabric & wadding. With the wadding on the bottom, lay the backing fabric wrong side against the wadding (we used an assortment of Redwork Christmas fabrics), then lay the cut out stockings right side down on top of the backing fabric. Pin in place and sew the sides but not the top of each stocking (you will be able to see the outside line to stitch on from the wrong side of the fabric). Cut out each stocking leaving a 1/4″ seam, then turn right side out and press. Work out the centre of your bunting tape, then insert a stocking so that the raw edge is enclosed when you fold the bunting tape in half lengthwise. Pin in place, then work out what distance you want to place each stocking, pining in place as you go. Stitch them into place with a red thread, along the length of the bunting tape close to the edge making sure you catch the back of the folded bunting tape as you go. Lay the ric rac over the top of the bunting tape and stitch in place using a cotton to match the ric rac. Create a loop on each end for hanging.
Ornament Garland: Cut out eighteen 9″ wide x 10″ long red fabrics from the Redwork Christmas range. Cut out nine pieces of fusible wadding 9″ x 10″. Iron a piece of red fabric to the front and back of each piece of wadding, then set aside.
Iron bondaweb onto the wrong side of each ornament design from the panel, then cut them out allowing 1/4″ away from the design. Peel the paper off the back & position each ornament in the centre of the 9″ wide x 10″ long red fabric/wadding piece (on one side only). Iron in place. Decorate as desired using a machine or hand, cotton thread or embroidery thread & embellish as desired. On the two 10″ sides of the flag, measure down 7″ from the top & mark this position. Along the bottom of the flag, find the centre. Now cut from the 7″ mark on one side, to the bottom centre point. Now cut from the from the 7″ mark on the other side, to the bottom centre point so that you create an pointy garland flag. From the stripy red & white fabric, cut 11 strips of fabric 2 1/2″ wide creating long strips. Take one strip and iron it in half lengthwise with wrong sides together. Now you are going to bind the sides of the flag like you would a quilt. Take a flag & starting on the top of the right hand side, position the stripy tape you’ve made so the raw edges of tape line up with the raw edge of the right hand side of the flag. Stitch using 1/4″ seam away from the raw edge, but stop at the corner. Make a little fold in the tape then start sewing down the next straight bit, but stop again at the point. Fold the tape back at 45 degrees away in the opposite direction you need to go in, then creating a fold that sits on the edge of the flag as you fold the tape forward again, laying it on the next straight bit & start stitching until you get to the next corner. Make a little fold in the tape again, then carry on stitching until you get to the top of the left hand side (do not stitch it on the top). Repeat this for all 9 flags. Fold the folded edge of the binding around to the back of each flag & hand stitch down in place. Take the left over strips of stripy fabric & stitch them together end to end so you have a length of approx 4m. Iron in half with wrong sides together. Starting at the centre point of the long folded strip, position the centre of the strip on the centre point of the top of one flag, with raw edges of the strip matching the raw edges of the top of the flag, pin in place. Work out how far you want to space the flags apart & repeat the process pinning each one in place. Stitch in place using a 1/4″ seam from the raw edge. Fold the folded edge of the binding strip over to the back of the flags & hand stitch down. Finish off each end with a loop & maybe a button.
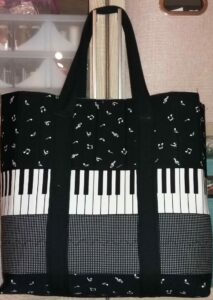
Our lovely customer Annette has made this amazing Music bag from our Music Notes & Piano Keys fabric, forming pockets on the outside & lining it with a musical cotton fabric.
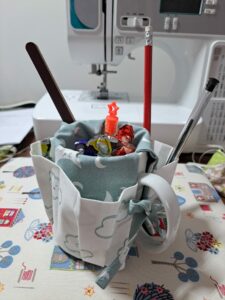
Our lovely customer Tess purchased Sally’s Mug Organiser Pattern & these are her comments. They’d make a great Mother’s Day present too! Thanks for sharing it with us Tess.
Good afternoon Sally
I made this at the weekend, what a Brill present. Love it.
Sally visited the lovely ladies at their quilting group in St Wenn to teach her Honeybun Kisses cushion Workshop.
Many of the ladies made the cushion in their chosen fabrics, and Bernie kept going with hers and finished it off as this stunning quilt! Well done ladies & Bernie!
Debbie purchased rather a lot of farmhouse flannel, dark grey from us to compliment the layer cake she had found. She lives in Wales and we were the only place she could source it. Her daughter had asked for a quilted jacket and this material is warm, drapes beautifully and was lovely to work with. What a lucky daughter!!!
We use cookies on our website to give you the most relevant experience by remembering your preferences and repeat visits. By clicking “Accept”, you consent to the use of ALL the cookies. However you may visit Cookie Settings to provide a controlled consent.
This website uses cookies to improve your experience while you navigate through the website. Out of these, the cookies that are categorized as necessary are stored on your browser as they are essential for the working of basic functionalities of the website. We also use third-party cookies that help us analyze and understand how you use this website. These cookies will be stored in your browser only with your consent. You also have the option to opt-out of these cookies. But opting out of some of these cookies may affect your browsing experience.
Necessary cookies are absolutely essential for the website to function properly. These cookies ensure basic functionalities and security features of the website, anonymously.
Cookie
Duration
Description
cookielawinfo-checkbox-advertisement
1 year
Set by the GDPR Cookie Consent plugin, this cookie records the user consent for the cookies in the "Advertisement" category.
cookielawinfo-checkbox-analytics
11 months
This cookie is set by GDPR Cookie Consent plugin. The cookie is used to store the user consent for the cookies in the category "Analytics".
cookielawinfo-checkbox-functional
11 months
The cookie is set by GDPR cookie consent to record the user consent for the cookies in the category "Functional".
cookielawinfo-checkbox-necessary
11 months
This cookie is set by GDPR Cookie Consent plugin. The cookies is used to store the user consent for the cookies in the category "Necessary".
cookielawinfo-checkbox-others
11 months
This cookie is set by GDPR Cookie Consent plugin. The cookie is used to store the user consent for the cookies in the category "Other.
cookielawinfo-checkbox-performance
11 months
This cookie is set by GDPR Cookie Consent plugin. The cookie is used to store the user consent for the cookies in the category "Performance".
CookieLawInfoConsent
1 year
CookieYes sets this cookie to record the default button state of the corresponding category and the status of CCPA. It works only in coordination with the primary cookie.
enforce_policy
1 year
PayPal sets this cookie for secure transactions.
rc::a
never
This cookie is set by the Google recaptcha service to identify bots to protect the website against malicious spam attacks.
rc::c
session
This cookie is set by the Google recaptcha service to identify bots to protect the website against malicious spam attacks.
ts
1 year 1 month 4 days
PayPal sets this cookie to enable secure transactions through PayPal.
ts_c
1 year 1 month 4 days
PayPal sets this cookie to make safe payments through PayPal.
viewed_cookie_policy
11 months
The cookie is set by the GDPR Cookie Consent plugin and is used to store whether or not user has consented to the use of cookies. It does not store any personal data.
Functional cookies help to perform certain functionalities like sharing the content of the website on social media platforms, collect feedbacks, and other third-party features.
Cookie
Duration
Description
_hjAbsoluteSessionInProgress
30 minutes
Hotjar sets this cookie to detect a user's first pageview session, which is a True/False flag set by the cookie.
LANG
9 hours
Linkedin set this cookie to set user's preferred language.
nsid
session
PayPal sets this cookie to enable the PayPal payment service on the website.
tsrce
3 days
PayPal sets this cookie to enable the PayPal payment service on the website.
x-pp-s
session
PayPal sets this cookie to process payments on the site.
Performance cookies are used to understand and analyze the key performance indexes of the website which helps in delivering a better user experience for the visitors.
Cookie
Duration
Description
_gat
1 minute
Google Universal Analytics sets this cookie to restrain request rate and thus limit data collection on high-traffic sites.
l7_az
30 minutes
This cookie is necessary for the PayPal login function on the website.
Analytical cookies are used to understand how visitors interact with the website. These cookies help provide information on metrics the number of visitors, bounce rate, traffic source, etc.
Cookie
Duration
Description
_fbp
3 months
Facebook sets this cookie to display advertisements when either on Facebook or on a digital platform powered by Facebook advertising after visiting the website.
_ga
1 year 1 month 4 days
Google Analytics sets this cookie to calculate visitor, session and campaign data and track site usage for the site's analytics report. The cookie stores information anonymously and assigns a randomly generated number to recognise unique visitors.
_ga_*
1 year 1 month 4 days
Google Analytics sets this cookie to store and count page views.
_gcl_au
3 months
Google Tag Manager sets the cookie to experiment advertisement efficiency of websites using their services.
_gid
1 day
Google Analytics sets this cookie to store information on how visitors use a website while also creating an analytics report of the website's performance. Some of the collected data includes the number of visitors, their source, and the pages they visit anonymously.
_hjFirstSeen
30 minutes
Hotjar sets this cookie to identify a new user’s first session. It stores the true/false value, indicating whether it was the first time Hotjar saw this user.
_hjRecordingEnabled
never
Hotjar sets this cookie when a Recording starts and is read when the recording module is initialized, to see if the user is already in a recording in a particular session.
_hjRecordingLastActivity
never
Hotjar sets this cookie when a user recording starts and when data is sent through the WebSocket.
_hjSession_*
1 hour
Hotjar sets this cookie to ensure data from subsequent visits to the same site is attributed to the same user ID, which persists in the Hotjar User ID, which is unique to that site.
_hjSessionUser_*
1 year
Hotjar sets this cookie to ensure data from subsequent visits to the same site is attributed to the same user ID, which persists in the Hotjar User ID, which is unique to that site.
_hjTLDTest
session
To determine the most generic cookie path that has to be used instead of the page hostname, Hotjar sets the _hjTLDTest cookie to store different URL substring alternatives until it fails.
CONSENT
2 years
YouTube sets this cookie via embedded YouTube videos and registers anonymous statistical data.
sbjs_current
session
Sourcebuster sets this cookie to identify the source of a visit and stores user action information in cookies. This analytical and behavioural cookie is used to enhance the visitor experience on the website.
sbjs_current_add
session
Sourcebuster sets this cookie to identify the source of a visit and stores user action information in cookies. This analytical and behavioural cookie is used to enhance the visitor experience on the website.
sbjs_first
session
Sourcebuster sets this cookie to identify the source of a visit and stores user action information in cookies. This analytical and behavioural cookie is used to enhance the visitor experience on the website.
sbjs_first_add
session
Sourcebuster sets this cookie to identify the source of a visit and stores user action information in cookies. This analytical and behavioural cookie is used to enhance the visitor experience on the website.
sbjs_migrations
session
Sourcebuster sets this cookie to identify the source of a visit and stores user action information in cookies. This analytical and behavioural cookie is used to enhance the visitor experience on the website.
sbjs_session
1 hour
Sourcebuster sets this cookie to identify the source of a visit and stores user action information in cookies. This analytical and behavioural cookie is used to enhance the visitor experience on the website.
sbjs_udata
session
Sourcebuster sets this cookie to identify the source of a visit and stores user action information in cookies. This analytical and behavioural cookie is used to enhance the visitor experience on the website.
Advertisement cookies are used to provide visitors with relevant ads and marketing campaigns. These cookies track visitors across websites and collect information to provide customized ads.
Cookie
Duration
Description
fr
3 months
Facebook sets this cookie to show relevant advertisements by tracking user behaviour across the web, on sites with Facebook pixel or Facebook social plugin.
IDE
1 year 24 days
Google DoubleClick IDE cookies store information about how the user uses the website to present them with relevant ads according to the user profile.
test_cookie
15 minutes
doubleclick.net sets this cookie to determine if the user's browser supports cookies.
VISITOR_INFO1_LIVE
5 months 27 days
YouTube sets this cookie to measure bandwidth, determining whether the user gets the new or old player interface.
YSC
session
Youtube sets this cookie to track the views of embedded videos on Youtube pages.
yt-remote-connected-devices
never
YouTube sets this cookie to store the user's video preferences using embedded YouTube videos.
yt-remote-device-id
never
YouTube sets this cookie to store the user's video preferences using embedded YouTube videos.
yt.innertube::nextId
never
YouTube sets this cookie to register a unique ID to store data on what videos from YouTube the user has seen.
yt.innertube::requests
never
YouTube sets this cookie to register a unique ID to store data on what videos from YouTube the user has seen.


 We like the way the quilting has been done too.
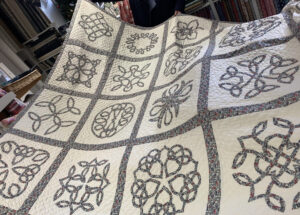
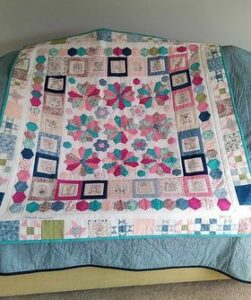
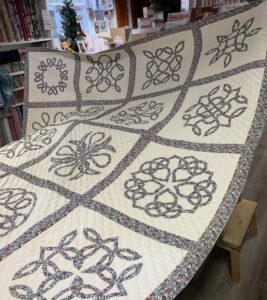 Sylvia dropped by to show us her simply gorgeous Celtic Knot quilt made using


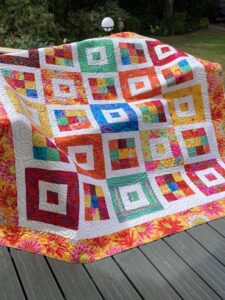
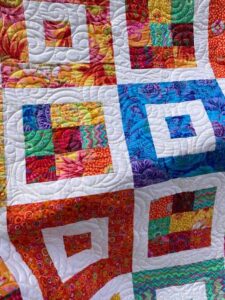 Kim showed us her deliciously colourful quilt made by combining