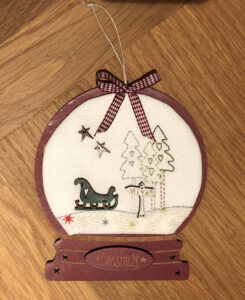
I have used the Snowglobes & a pack of hand painted wooden buttons that we stock to create a beautiful Christmas decoration.
you will need:
Snowglobe
Button pack
paper
pencil
compass
Micron or Frixon pen or similar
6” square wadding
6” light weight iron on Vilene
6” square of background fabric
3″ x 6″ piece of fabric to represent snow on the ground (if you’re doing the same button pack as I used)
6” square bondaweb (optional)
6” square card (mount board or two pieces of cereal packet card)
lightbox (optional)
Pritt Stick glue or similar
Sewline Fabric Glue Pen
25cm Ribbon (optional)
1. Using a compass, measure 2 1/4” from the compass point to the pencil & draw a circle onto plain paper. Cut it out then lay it onto your Snowglobe & fold the bottom of the paper up slightly to match the shape on the snowglobe. Cut the folded bit off. You now have a template for your finished stitchery size.
2. Choose a suitable pack of buttons (I used the Sleigh, Stars & Sign button pack). Open the pack & carefully remove the buttons, taking care not to spoil the button pack background design. Lay your template over the button pack background design & position until the design fits centrally on your template piece. (You may need a light box or put your papers against a window to see through it. Trace the design in pen.

3. Cut a piece of background fabric 6” square & iron a piece of light weight iron Vilene onto the reverse of the fabric. Now centre your fabric over the design & trace the design onto your fabric using a Micron or Frixon pen.
4. Stitch the outline of the design you’ve traced to achieve a similar look to the design on your chosen button pack. Use your imagination & include sparkly threads where appropriate or bondawebbed fabric if required (don’t forget you need to reverse any design you bondaweb). (The drawn circle was larger than the template so it won’t show on the finished ornament).

5. When you’ve finished sew your buttons in place. Cut a piece of wadding & a piece of card the same size & shape as you paper template (two pieces a cereal packet card glued together is strong enough). Use Pritt Stick to glue the wadding onto the card. Cut out your finished stitched design 1/2” larger all the way around than your paper template. Now position your stitchery design over the wadding & card pieces so it’s centred. Keeping it in place, carefully turn it over and using your Sewline Fabric Glue pen, glue around the outside and stick the fabric to the back of the card so it’s nice and taught.

6. When this is dry, glue your design to the centre of the snowglobe & I also added a bow to the bottom of the loop of string it hangs by.
Why not make them as gifts for friends and family!