Posted on

Michelle’s Show n Tell


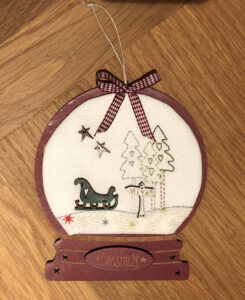
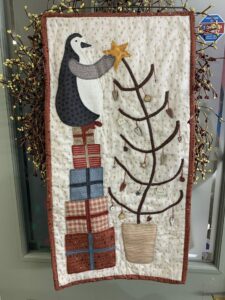
This lovely wall hanging is made from one block of Friends for Christmas by Lynette Anderson. It’s a great way of making smaller projects rather than a large quilt if you are short of space. Many Block quilts can be split into smaller sections for hangings, cushions, table runners etc, Show us your ideas and we will add them to our Customer Gallery. 


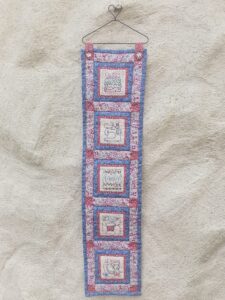
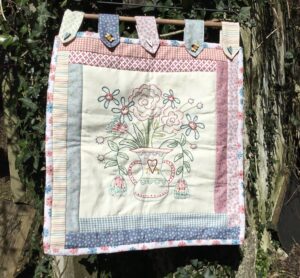
Michelle used images from the Heartstrings Pre Printed Stitchery panel to make this pretty wall hanging.

We have made up Stitchery kits using images from four of the panels so you can recreate something similar. Kits are available for Willowbrook, Heartstrings, Make Ready for Christmas and Letter to my Daughter.

Each pack contains a selection of images, DMC threads and three fat 1/16s of fabric.


Look at this gorgeous sample using one of the images from the Blume & Grow panel from The Birdhouse. Michelle has used fabrics from the Blume & Grow range and we think it’s a delightful sunny wall hanging that could also be made into a cushion. The back is equally as pretty as it is made up of pieced strips of the fabric. The hanging is displayed on a heart top wire hanger.

Michelle has plans for the remaining images to use in bags and a block keeper. Watch this space for updates.

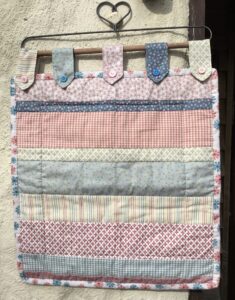
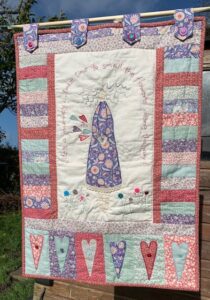
Life’s a Journey is one of our all time favourite wall hanging patterns, with the words “Life’s a journey, take time to smell the flowers along the way”, which reminds us to stop for a moment and appreciate what’s around us, whilst we rush through our busy lives.

Designed by House on the Hill, their pattern was made in earthy colours, but we also love Michelle’s version done in beautiful Tilda fabrics in blues, pinks and reds!  Michelle & her friend Vicki stitched them “virtually” together, with Michelle here in Cornwall & her friend Vicki who’s overseas, & you can see their beautiful wall hangings below.

You can have fun embellishing the hearts and tabs with some of your favourite buttons from your button tin, or perhaps with a pack of our beautiful hand painted heart buttons?

Life's a Journey


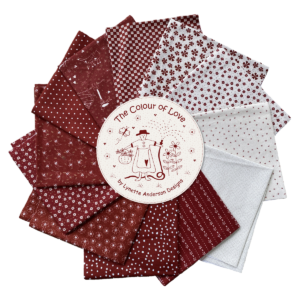
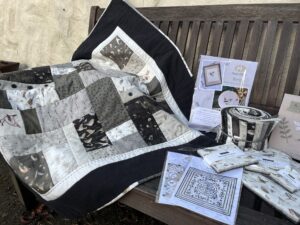
Michelle has been busy designing a new paper pieced cushion using Lynette Anderson’s new fabrics, the Colour of Love fabrics by Lynette Anderson, with the Jewel 1.5″ x 3″ paper pieces to create the heart shapes.  There’s also an acrylic template available to help you cut out your pieces.

The hearts were stitched on a cream background & Michelle used our soft Sligo in Sand colour for the cushion back.

She’s added embroidery using DMC 221 & a lovely selection of wooden & shell heart buttons

You can make the cushion as long as you want, but Michelle’s is approx 40cm high x 1m long & has 1 1/2 pillows inside.  Michelle’s pattern is available to purchase here

Posted on

Botanicals Lap Quilt Using Days In Provence Pattern


In the last two years, especially after taking up wild swimming and with the addition of a puppy to our family, I have become more aware of the nature and landscapes around me in the beautiful county of Cornwall where I live.  From walking across fields & seeing wild flowers, to swimming in the sea & watching my friend Fi feed a friendly Robin after our swim, so when I was shown Janet Clare’s stunning Botanicals fabrics I fell in love with it.

I’d been looking for the perfect pattern to show off all the beautiful bird & flower designs featured on the Botanicals fabrics & decided to use the Days in Provence pattern by House on the Hill.

I used a fat 1/8th bundle of Botanicals fabrics, adding an extra 1 1/2″ (finished sized) border of Moda Textile Solid Parchment fabric, before adding the final border, which I chose the soft black Sligo Linen.

On two of the blocks where the lavender was embroidered on the original pattern, I used Janet Clare’s Little Wren embroidery kit instead, to keep with the theme of Botanicals.  I did a running stitch in a charcoal embroidery thread on the parchment border, adding a little snail who has slightly strayed from the line.


On the black Sligo Linen I embroidered the flying owl design found in Janet Clare’s beautiful Field Guide book, using chacopy paper to transfer the design onto the linen.

I put wadding in between, then backed it with a Farmer’s Shirt Flannel and quilted in the ditch, adding a chunky running stitch in embroidery thread on a couple of centre blocks as a feature, along with some black buttons on a couple of the longest thin blocks.

Finally to finish the quilt, I made a scrappy binding from the fabrics left from the fat 1/8th bundle.

Posted on

The Mermaid of Zennor

One fine Sunday morning in Zennor church, perched on the cliffs of Penwith, the choir and congregation were ready for service when through the church door came a strange lady of unearthly beauty.  Her green eyes looked back calmly at the villagers, who were staring, for newcomers were rare in that far-flung parish; her tawny-gold hair flowed down over her back, wild and untrained; the long dress she wore swept the ground like a bride’s train, and was made of some material that no one there had ever seen, for it shimmered like the sea on a sunny day.  She sat near the door in a pew on her own, away from other people.

In the choir were some fine singers, but none finer than Mathy Trewhella, a handsome young man who sang a clear high tenor:  his voice could be heard all over Zennor Churchtown when he wished.  As the choristers sang their hymns and psalms Mathy became aware of the stranger staring at him with those emerald-green mysterious eyes; when he looked at her it seemed to him that a queer faint smile hovered on her face.  After the service she was the first to leave the church, and those who went out after her thought it strange how rapidly she had disappeared, as they could not see her anywhere outside.

Five or six times this unknown lady came to Zennor church, always on a fine day, and always she sat far apart from the congregation, watching Mathy and listening to every note he sang.  Her eyes seemed to look right through him, and her gaze somehow reminded him of the dim light in caves under sea.  He determined that somehow he would find out who she was.

The next time she appeared in church he was ready.  Before the end of the service, as the parson gave the benediction, Mathy slipped from the choir stalls and let himself out of the little side door of the church.  And so, as soon as the lady emerged, first as usual from the main door, he was at her side.  She smiled as if she had been expected him, and took his arm; and thus they left the churchyard together.  People coming after them saw them take the winding path that led down the valley towards the sea.

That was the last Zennor saw of Mathy Trewhella.  His old mother was heartbroken for a long time, but at least she had other grown children to comfort her.  The story of how Mathy disappeared with the stranger was a great mystery, often talked about, and unsolved for many years; in fact two generations had been born and grew up in the village, and old Mrs Trehwella was in her grave before news came of him.

A ship bound for Penzance, and captained by a man who knew Zennor well, came by one day and anchored off Pendower Cove; she put out a boat to get some water from the shore.  Soon a woman’s voice was heard calling urgently, “Ship!  Ship ahoy!” and the watch, looking overboard, saw a mermaid with green eyes and tawny-gold hair swimming beside them.  “Tell your captain to haul up your anchor,” she cried.  “For ‘tis lodged against the door of my home on the sea-bed, and I can’t get in to my Mathy and children.”

At this the captain came to the side and questioned her.  “Excuse me, ma’am, but did you say your Mathy?  Mathy who, may I ask?”  Sailors are always very respectful to mermaids, who have powers to cause shipwrecks and disaster, and often use them if they are annoyed.

“Mathy Trewhella, my husband, of course,” she said.  “Now haul away, if you please.”  The captain did not stay to argue, but brought up the anchor immediately.  And with a swish from her long gleaming tail she was gone, diving down to the sea-bed and her family.

So Zennor heard the news, and learned Mathy’s fate.  Neither he nor the mermaid has ever been since, but in Zennor church now is a bench end carved to show what she looked like:  long flowing hair, a sea-siren’s face, and a curved scaly tail.  And for all we know, Mathy is still down there on the ocean floor, singing sweetly to his mermaid wife and their children.
Extract from Cornish Heritage Trust.

We love a Cornish folktale to inspire us & who doesn’t love a tale about mermaids!  Shell We Dance is a gorgeous range of “mermaid” themed fabrics by Lewis & Irene, perfect for a “Mermaid project”

Posted on

Snowglobe Decorations- How to make them…

I have used the Snowglobes & a pack of hand painted wooden buttons that we stock to create a beautiful Christmas decoration.

you will need:
Snowglobe
Button pack
paper
pencil
compass
Micron or Frixon pen or similar
6” square wadding
6” light weight iron on Vilene
6” square of background fabric
3″ x 6″ piece of fabric to represent snow on the ground (if you’re doing the same button pack as I used)
6” square bondaweb (optional)
6” square card (mount board or two pieces of cereal packet card)
lightbox (optional)
Pritt Stick glue or similar
Sewline Fabric Glue Pen
25cm Ribbon (optional)

1. Using a compass, measure 2 1/4” from the compass point to the pencil & draw a circle onto plain paper.  Cut it out then lay it onto your Snowglobe & fold the bottom of the paper up slightly to match the shape on the snowglobe. Cut the folded bit off. You now have a template for your finished stitchery size.

2.  Choose a suitable pack of buttons (I used the Sleigh, Stars & Sign button pack). Open the pack & carefully remove the buttons, taking care not to spoil the button pack background design.  Lay your template over the button pack background design & position until the design fits centrally on your template piece. (You may need a light box or put your papers against a window to see through it. Trace the design in pen.

3. Cut a piece of background fabric 6” square & iron a piece of light weight iron Vilene onto the reverse of the fabric. Now centre your fabric over the design & trace the design onto your fabric using a Micron or Frixon pen.

4.  Stitch the outline of the design you’ve traced to achieve a similar look to the design on your chosen button pack.  Use your imagination & include sparkly threads where appropriate or bondawebbed fabric if required (don’t forget you need to reverse any design you bondaweb).  (The drawn circle was larger than the template so it won’t show on the finished ornament).

5.  When you’ve finished sew your buttons in place.  Cut a piece of wadding & a piece of card the same size & shape as you paper template (two pieces a cereal packet card glued together is strong enough).  Use Pritt Stick to glue the wadding onto the card.  Cut out your finished stitched design 1/2” larger all the way around than your paper template.  Now position your stitchery design over the wadding & card pieces so it’s centred.  Keeping it in place, carefully turn it over and using your Sewline Fabric Glue pen, glue around the outside and stick the fabric to the back of the card so it’s nice and taught.

6.  When this is dry, glue your design to the centre of the snowglobe & I also added a bow to the bottom of the loop of string it hangs by.

Why not make them as gifts for friends and family!

Posted on

Job Opportunity – Part-time Sales Assistant

Job Description:

● 3 to 4 days a week including some Saturdays, working hours are 9.30 – 4.30 plus any overtime required. Extra days will occasionally be required to cover holidays.
● Job includes serving & advising customers on sewing related queries so must have a good eye for colour & knowledge of a sewing craft (embroidery, quilting, etc)
● Requires a polite and good telephone manner to answer the phone
● Be computer literate with a basic knowledge
● Fill website orders, manage website and shop stock
● Must be trustworthy, reliable, patient, work methodically, accurately, tidily & work well as part of a small team.
● Must be good at maths.
● A knowledge of retail is an advantage but not essential.

Please be aware this role can be physically demanding, with lifting, carrying & cutting fabric, and you are on your feet most of the day. Following current guidelines we also ask customers and staff to wear a mask whilst customers are in the shop.

If you are interested in joining our happy team, and receiving a generous staff discount, please send a CV & covering letter to sally@coastandcountrycrafts.co.uk or drop one into the shop for the attention of Sally.

Closing date Sunday 10th October 2021

Posted on

How Batik Fabric is Made

Batik is an Indonesian technique of wax-resist dyeing applied to the whole cloth. This technique originated from the island of Java, Indonesia.

The artist uses wax to prevent dye from penetrating the cloth, leaving “blank” areas in the dyed fabric. The process, wax resist then dye, can be repeated over and over to create complex multicolored designs. Batik is made either by drawing dots and lines of the resist with a spouted tool called a canting, or by printing the resist with a copper stamp called a cap.

Posted on

NEW ARRIVAL – Noel

We have fallen in love with the New Arrival – Noel – from Lewis and Irene

With traditional festive colours of Reds, Greens, and Light Taupe this collection also has a little sparkle with accents of metallic gold running through the prints. We love this collection for the adorable winter characters and illustrations in the feature fabric.

Our Mary is an incredibly skilled crafter and she has designed a beautiful Painted Flowers Cushion using the Somerset Patchwork technique to create a really interesting texture. We think this cushion would look absolutely gorgeous in the Noel collection . . . especially with the sparkles!


Posted on

Redwork Embroidery – Deck the Halls


We love the simplicity of Redwork Embroidery, with its impactful clean lines, and the designer Natalie Bird from The Birdhouse Designs produces some of our favourite line work stitcheries, with adorable and whimsical characters and phrases. We’re also a little rebellious at Coast and Country . . .

. . . We really enjoy adapting patterns to make them more personal to our own styles. Michelle has been working on the design Deck the Halls and has created a stunning wall hanging! By playing with various stitch techniques and introducing colour to the Redwork Embroidery pattern (we know it’s shocking!), she has been able to create something that is simply beautiful and unique for the festive season!

With a little bit of Christmas magic, some help from the ‘Embroidery Stitching Handy Pocket Guide,’ a selection of DMC threads and our useful stitch guide below, you’ll be able to make a wall hanging just as gorgeous!

Posted on

Liberty Mid-Summer Collection

Liberties Fabrics are internationally recognised as a leader in print design and textiles. They have created original and inspiring designs since 1875, and each season the Liberty’s studio designs new original prints, adding to their vast collection of iconic florals, paisleys, graphic geometrics and colourful conersationals. This season is no different with their stunning NEW RELEASE, Mid-Summer Flower Show Collection.

With classic Liberty florals the Mid-Summer Collection is filled with beautiful roses and posies, poppies and daisies. It is a real celebration of sunshine and garden flowers, and we just love the Pinks, Blues, Greens and Creams that pour through this range. We have available Bundles, Fat 1/4s, Fabric on the bolt as well as the accompanying Wiltshire Shadow basics.

We’re really excited by this collection and have a couple of pattern projects that would be perfect for this fabric range:

For the love of tea – A sweet little wall hanging by Hatched & Patched, with 12 stitcheries to create with tea in mind, such as Early Grey, Tea with honey, and Billy Tea, along with a tea bag and spoon.

Bunny Garden – Mrs Bunny has made friends with the prettiest of butterflies while the other naughty bunny has found a big juicy carrot to nibble on! Finished size approx. 12” x 13”

Posted on

Summer Projects for you and your little ones!

With six weeks of summer holidays ahead of us, and the British weather not always playing ball, we know how important it is to have a couple of rainy day activities up your sleeve. We love spending time crafting with our little ones and so we’ve put together a list of some great projects for different ages, which we hope will bring you hours of entertainment!


Projects for 4 Years +

These are great project books for your Littles to get stuck into with a bit of assistance from you.

We also love the felt kits, Corinne Lapierre which are simple enough for younger children to enjoy making and can start learning how to do basic stitching. Everything is included with these kits all you need is a pair of scissors to get going!


Projects for 8 Years +

‘In a Hoop’ projects are fantastic for older children as you are able to help set them up and allow them to explore and have fun crafting. Corinne has two beautiful hoop kits for the animal lover’s out there.

We also highly recommend Nan’s Garden, which is perfect for beginners to learn a series of embroidery techniques. These can be great to make as a beautiful wall hanging, or can be reproduce in different colour-ways as gifts for their friends.


Projects for Teenagers

We thought a bit of dress making would be just the thing for your teenagers. We have some really beautiful patterns from Merchant and Mills & Sew House, simple, modern and perfect for the beginner to learn out to make their own clothes!


Let us know what you are getting up to with your young one’s and we’ll add it to our list to inspire others!